BLOG

Samyang’s 14/2.4 XP

Haitong Yu

Photographer from China


Samyang FE35/1.4AF: an ultra-versatile performer


When Samyang announced the 35/1.4 AF for Sony FE, I became immediately interested. Not only because of the convenience of autofocus, but also because I have very high expectation for its usage in astronomy photography.

This might come quite unexpected. Most people might think that astrophotography relies mostly on fast, wide-angle lenses (for night sky pictures with landscapes) or telescopes (for deep sky pictures), and that a fast 35mm lens is best suited for environmental portrait and culture shot.

Personally, however, I found that the viewpoint of 35mm offers a great balance between the details of the Milky Way and the environmental surroundings for astro-landscape pictures, and that its large aperture enables unmatched low-light image quality among wide angle lenses.


Sony A7M3, Samyang XP 14/2.4, ISO800, F2.4, 30s


Sony A7M3, 35/1.4AF, ISO800, F1.4, 10s, multi-frame stacking


Above is a comparison of the milky way, shot with an ultra-wide lens (Samyang 14/2.4 XP) and the 35/1.4 AF. It can be seen that in the 35mm shot, the milky way shows visibly better detail (colors and veins) while the whole picture has lower noise. Also I feel that the center of the milky way, one of the most photographed section of night sky, takes a perfect portion in the 35mm picture. Of course, an even longer lens – 50mm or 85mm – might be capable of showing even finer details, but their long focal length means you have to shorten the exposure time to less than 10s or otherwise the stars will start to blur. I am more comfortable to use the longer lenses on an equatorial mount which cancels the rotation of the earth to enable longer exposure.


Sony A7M3, 35/1.4AF, ISO800, F1.4, 10s, multi-frame stacking


Apart from the absolutely brightness, another reason I prefer 35mm lenses to wider primes is that they often correct image aberrations more brilliantly. Image aberrations are the optical imperfections in lens design that makes image blurry and the stars not pinpoint any more in the resulting pictures. They can be particularly annoying in astrophotography, because you are most likely to use the fastest aperture and focus to infinity. In this scenario, the stars at the image corners will have strange shapes in a lens with aberrations like coma and astigmatism. Unpleasant colors will also appear around the brighter stars and at the edge of the image due to chromatic aberrations.


 ;

An example of lens aberration wide-open. The 100% crop at upper-right corner shows the strange shape and colors of the stars.


The FE35/1.4AF, albeit being a very fast lens, shows very little aberration in this regard. Below is an example, where I deliberately filled the whole image with stars and shot the lens wide-open to see its performance.


Full image. Sony A7R2, Samyang 35/1.4AF, F1.4, 8s, ISO1600


Here’s a 100% crop at the image center (without any correction of chromatic aberration):


And a 100% crop at the upper-left corner:


It can be seen that in the image center, the brighter stars boomed out a little due to slight spherical aberration. Yet at the extreme corner, only the brightest stars showed trace of deformation. This is exceptional performance to me, considering these are 100% crops on a 42 megapixel sensor, which puts ultra-high demand on today’s lenses. Chromatic aberrations are not corrected as nicely, as you can see some stars have colorful fringes. I suggest some fine tune using the “defringe” function in Adobe Camera RAW to get rid of them quite easily.

As a side note, personally I like the lens’s reproduction of brighter stars with some “blooming” effect, because it helps to differentiate the brighter stars from the dimmer ones. This behavior is very similar to the naked eye, which helps to show the bright constellations, such as the famous Big Dipper (on the right of the image):


Wind turbine blowing towards the Big Dippers.


Another great way to use the 35mm lens for astrophotography is making panoramas. Not only does stitching a panorama image with multiple shots help to widen the field of view, it also has greatly improved details and lower noises when comparing to a single shot with a wider lens.


This image is made by 4 vertical images shot from right to left. The stitching is done with Adobe Camera RAW. You can also use more professional panorama tools such as PTGui.


Winter milky way over snow-covered hills. This vertical panorama is made with 3 images shot in horizontal (landscape) orientation.


As a final remark, I found the 35/1.4AF is an excellent and greatly versatile lens. Its superb resolution let me handle the themes like astronomy and landscape at ease. The addition of autofocus is silent and fast with the cameras I put it on (Sony A9, Sony A7R3, Sony A7M3), which means I can capture motion, street scenes and portrait with great freedom. I am very happy to have this lens in my camera bag.


Some more sample images with the 35/1.4 AF.


A pathway to the Jupiter. Sony A7M3, 35/1.4, F1.4, ISO640, 13s, brightened in post


Milky way before morning blur hour. Sony A7M3, 35/1.4, F1.4, ISO640, 10s, brightened in post


The national flag honor guard marching at dawn. Sony A9, 35/1.4, F1.4, ISO1600, 1/50s


Foggy terrace in early spring. Sony A7R3, 35/1.4, F5.6, ISO100, 1/125s


Girl in the field of flowers. Sony A7R3, 35/1.4, F1.4, ISO100, 1/2000s


 ;
We noticed that you are accessing from United-States of America.

If you're looking for another location, please select your location.

Country/ Region
Online shop
GO
Newsletter Feedback Shop
Now

Samyang’s Guide to Achieving the Optimal Angle of View

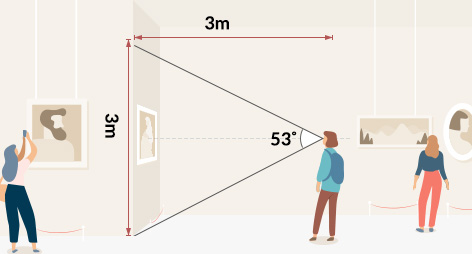
The perfect spacing and distance are always necessary when shooting all kinds of subjects, including people, to give them a proper relationship with the beautiful space around them. So, what’s the exact distance that helps you best appreciate a work of art, or a photo?

The correct answer is the diagonal length of the full frame of a subject.

표준화각 자료 이미지
표준화각 자료 이미지

The best standpoint from which to appreciate the full view of a subject is the distance of the diagonal length of the subject frame. This wider angle is superior to standing closer at a 50 degree angle to get a more detailed view. This notion of an ideal distance or view point is also applicable in the world of photography.

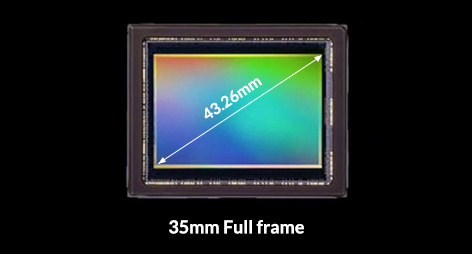
For still images, keeping a distance equal to the diagonal length of the full image surface is recommended. The full frame sensor of a digital camera is 36 x 24mm and the diagonal length is 43.26mm so any distance close to this number is nearer to the ideal than the currently accepted industry standard of 50mm.

Back when film cameras were common, 45mm was the industry standard and this continued as reflex cameras needed extra space to fit a mirror. However, as mirrorless cameras become more popular again, there has been a need to return to this industry standard…which is the impetus for the Samyang AF 45mm F1.8 FE. With less distortion than a 35mm lens and wider angles than a 55mm lens, the Samyang AF 45mm F1.8 FE is a perfect lens for portraits, landscapes, architecture photography, and pictures of pets.

What is Preset Aperture Control Function?

On the Preset Aperture Control function, the aperture blade operates smoothly like a "De-clicked lens", which is advantageous for video recording.
Fujifilm cameras are engineered to control the aperture according to the minimum exposure value(F-stop), so when the camera controls the aperture, it blinks momentarily to set the proper exposure.

AF 75mm F1.8 X intentionally disconnects the communication with the camera body and the lens itself on the Preset Aperture Control function, so it is possible to smoothly adjust the exposure without flickering. ISO and shutter speed are adjusted according to the changed exposure by controlling the aperture, so the exposure value can be changed even with the 1/2 F-stop.

What is Recommended Settings for Preset Aperture Control Function?

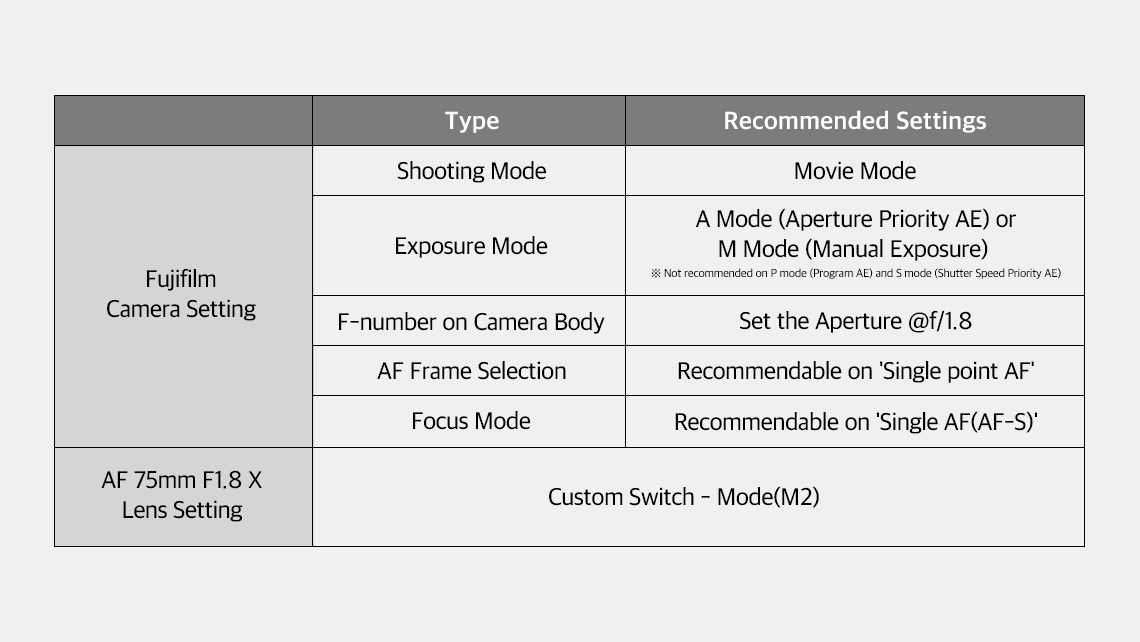
The Preset Aperture Control function operates only when shooting video(Movie mode) and the focusing mode of the camera is set to AF mode. Please set the aperture at f/1.8 before switching the "Custom Switch" to "Mode 2. It is recommended to set the "Exposure mode" as A mode (Aperture Priority AE) or M mode (Manual Exposure).

* How to use the “Preset Aperture Control” function?

1) Camera Body Setting
      AF Mode → Video Mode ('A' or 'M' mode) → Set the Aperture @F1.8
(2) Lens Setting
      Switch your "Custom Switch” to “Mode 2(M2)"
(3) Now, you're ready to use the Preset Aperture Control function with your focus ring

[What is Dolly Shot? How to Shoot Easily]

[What is Dolly shot?]

A dolly shot, also referred to as a tracking shot or trucking shot, is a camera movement technique used by cinematographers to track and follow a subject in motion. To achieve this, the camera is mounted on a device called a "dolly," which facilitates smooth tracking movement. The dolly can move in front of, behind, or alongside the subject, which can be a person, a location, a product, or any other object of focus in the frame. Through this, you can control the emotional distance between the subject and the viewer by highlighting the audiovisual and dramatic effects.

[How to take a Dolly Shot simply by handheld]

Tip. If the moving distance is long, the camera may shake, so please shoot at a focal length between 35 and 100mm.
1. Stand at a distance of about 1.5 to 2 meters away from the subject.
2. Set the custom switch to MF and Mode 3 and adjust the focal length to about 100mm.
3. After focusing on the subject, set the aperture to F8~16.
4. Slowly turn the zoom ring to the left (towards the wide-angle end) while using your upper body and arms to move the camera toward your subject.
5. Dolly Shot complete!
※ When shooting from a farther distance from the subject, use a cart or gimbal for more stable shooting.

DSLR / Full Frame
1D X Mark Ⅱ
1D X
1Ds Mark Ⅲ
1Ds
5DsR
5Ds
5D Mark Ⅳ
5D Mark Ⅲ
6D Mark Ⅱ
6D
DSLR / APS-H
1D Mark Ⅲ
1D
Mirrorless / APS-C
M6
M5
M10
M3
M2
DSLR / APS-S
7D Mark Ⅱ
7D
80D
70D
60D
30D
D60
D30
77D (9000D)
760D (8000D / Rebel T6s)
1300D (Kiss X80 / Rebel T6)
1200D (Kiss X70 / Rebel T5)
200D (Kiss X9 / Rebel SL2)
800D (Kiss X9i / Rebel T7i)
700D (Kiss X9i / Rebel T7i)
100D (Kiss X7 / Rebel SL1)
650D (Kiss X6i / Rebel T4i)
600D (Kiss X5 / Rebel T3i)
550D (Kiss X4 / Rebel T2i)
500D (Kiss X3 / Rebel T1i)
1000D (Kiss F / Rebel XS)
450D (Kiss X2 / Rebel X냐)
DSLR / Full Frame
D850
D5
D810A
D4S
D810
D750
Df
D610
D4
D800
D800E
D600
D3s
D3x
D700
D3
DSLR / APS-C
D7500
D3400
D500
D5600
D7200
D5500
D3300
D7100
D5300
D5200
D7000
D300s
D300
DSLR / Full Frame
Z6
Z7
D810A
D4S
D750
D810A
DSLR / APS-C
D7200
D500
D3300
D5500
D5600
D3400
D7500

* Cameras released within 5 years from 2019 are tested.

Password reset reminder

Gildong Hong,it has been three months since your last password reset.

Forgot your password?
Please complete the form below

Send Authorization Code

Your authorization code will be sent to
Standard fees apply.

Failed

There is no ID found with that information.
Please confirm the accuracy of your information.

If you would like to create a new account, please click the below link.

Join now

Forgot your ID?
Please complete the form below

Please see the information below.

One ID found

If you would like to create a new account, please click the below link.

Join now

Failed

There is no ID found with that information.
Please confirm the accuracy of your information.

If you would like to create a new account, please click the below link.

Join now

Confirmation email sent

This is the last step to create your account.
Please follow the link sent to your email address.


Authorize account

이메일 발송 완료

고객님 메일로 임시비밀번호가 발송되었습니다.


확인

Change ID

Please enter your new email address.
Please log in with your new email address.

Current email address :
New email address :
Change email address

Change email address
Cancel

Error message

You do not have permission to access this server.
Please contact the administrator.

Go to home

Email authorization

Dear client,
Your registered email address on
Samyang Optics website is hongildong@naver.com.
Please click below to finalize your authorization to Samyang Optics.

Go to home

Didn’t join Samyang Optics?
Another user may have mistakenly entered your email address.
If you have not joined Samyang Optics, please use the link to report the mistake.

Please protect my email address.

- Samyang Optics Administrator -

Note : Please do not reply to this email as the address is a send-only account.
Please contact us with any questions via the following website. Go to website >

Protect email

There is an account created with your email address as below.
To discontinue using this account,
please click on the “block account” button.

hongildong@naver.com

Block account

Account authentication

Congratulations!
Your account has been verified.
Meet the various services of Samyang Optics!

Sign in
Go main

Find ID

There is no account matching your information.

Find ID

Confirm ID

Your ID is bebe***

Confirm

Confirm ID

There is no password matching your information.
Please check if your information is accurate.

Confirm

Find password

The reset password email has been sent to your
email address.

hongildong@naver.com

Follow the instructions in the email to reset your password.
If the email is not in your inbox, please check your spam mailbox.

Confirm

Can’t find the email?

Resend authorization mail

Find password

There is no password matching your information.
Please check if your information is accurate.

Confirm

sms test

USB Driver DOWNLOAD
ⓒDaniel Gangur

Sign Up for
Samyang Newsletter

Be the first to know about new product
announcement, global events and news!

By subscribing, you agree to the terms and conditions of use of the site and the use of personal information. Newsletter will be sent until unsubscribed.
Don't show this popup today

Samyang Optics,
with 50 years of history,
begins a new journey as
LK SAMYANG

Don't show this popup today
WE HAVE MOVED!

NEWSLETTER

Subscribe to our newsletter to receive new product alerts
and inspiring contents created with Samyang lens

Do not open this window for today
/upload/magazine/pro/1588686620(0).jpg