BLOG

Wedding Videography Checklist

Jay Gilmour

Photographer from England

Hi Jay Gilmour,
Please share some stories as a professional wedding videographer.
Hi, my name is Jay Gilmour, a full-time wedding videographer based here in Cumbria, the beautiful lake district.
One of the questions I get quite often is how to film a ceremony. I will talk about what to prepare for filming the wedding ceremony and some tips.

How Do You Prepare for a Wedding?
Well, the boring stuff is to make sure everything is charged, memory cards are formatted, and everything is there and working. 
I am methodical, to the point of being obsessive with my gear! Everything has its place (and labelled!). 
This has always helped me because if I forget a mic, a cable, or even something small like a tripod plate it can be an absolute disaster. 
A lot of wedding photographers and videographers like to go and scout the venue beforehand, I am the complete opposite, 
I like to see it with fresh eyes, this gets my creative mind in gear much quicker and I do not have to worry about any planned shots I had had to change, 
which happens often, due to timings, weather or whatever it may be.

What Goes into Creating the Perfect Wedding Memory?
God is in the detail,’ which seems fitting for a wedding! The best weddings are personalised, with small touches the couples use to make it theirs. 
It could be anything, small gifts, those little moments and even pets getting in on the big day!

My job is to relive the couple’s experience through the filming and editing process. There is not a one size fits all approach. 
When it comes to wedding videography yes, I have my style, but this differs slightly from film to film. 
For example, if the wedding was upbeat and had a party vibe, the film should be the same. 
On the other hand, if the event was more heartfelt and sombre again the film should reflect this.

I also try to tell the story of the day through the smaller moments. Every wedding has the “I do’s” and the speeches (some good, some bad!). 
But not everyone has that wink from a future father-in-law to his new son-in-law when coming up the aisle, 
not every wedding has that usually hard-faced father shedding a small tear of how proud he is when seeing his daughter in the wedding dress for the first time.

These are the moments I absolutely love and completely make the day for me. 
In turn, this can make the project extra special, during the ceremony people might not notice these moments. 
However, when they are captured on screen, they can reignite memories again and again and that makes it all worthwhile.


Are There Any Big Challenges That You Face During a Project?

Space is always an issue!

Physically, in Cumbria, our churches are beautiful, but small, and usually hundreds of years old. 

My village church dates to the 12th century! When it was built, I do not think they were thinking about wedding videographers! Ha-ha

Then, I can easily shoot 600-700 GB worth of footage in computer space, since I shoot 4K at 10-bit to get the best quality. 

It feels like I am constantly buying more space, even with the huge RAID drives I use.


During the wedding day itself, since I am working alone, it is sometimes difficult to prioritise or to know where you should be to get the most important shots of the day. 

For example, you need to be at the church/venue to set up, but one of the most important shots is the bridesmaids, 

the father, or the bride’s reaction shot which happens just before they leave. So, knowing your kit, 

where everything is, what needs to be done, all in a ridiculously short space of time, is crucial.


But apart from that, I have done enough now that hopefully, I can deal with any unexpected changes that may (and will) happen. 

And sometimes that is when you get the best shots!


Advice to Others/Beginners?

I adore my job; I genuinely love the reactions from guests and family at the wedding and take great pride in the responses and comments I get from people watching my films. So, in that sense, I wholeheartedly recommend aspiring individuals who are thinking about it, to just go for it.


On the other side, it IS stressful, and it is a loooooong day! Working 12 hours non-stop with heavy gear is not for everyone.


If you are looking to start, the best and easiest way is to offer to do it for free or cheap if family/friends are getting married and do not have a videographer. 

That way there is less pressure to get it right the first time.


The next small tip is about gear when you first start you tend to buy lots! Most of it you will not use, some of it you will use then realise it is not right for you. 

In time, you will notice what are your go-to pieces and when you need to add more to your collection of gear for a specific request or event.


Play around with your gear to get to know it better, use videos by the company or on places such as 

YouTube to learn tips and tricks and make amendments where necessary to make sure it fits into your workflow.


Wedding Videography Checklist - JAY’S GO-TO KIT

Whether you are a beginner or an experienced videographer, you need two cameras for a wedding. It gives you options on the angle and, 

more importantly, it can cover up mistakes or issues. Mistakes do and will happen, no matter how long you have been in the industry! 

I would suggest getting two cameras of the same brand, so you do not have any issues matching footage later.

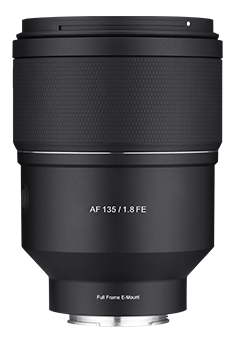
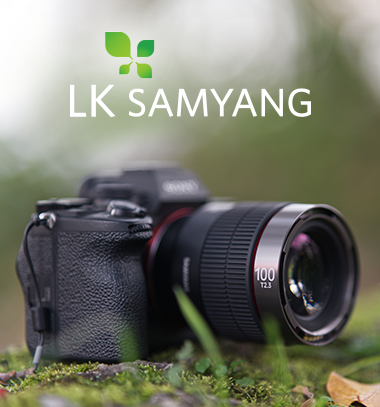
Two cameras mean more than one lens. I use a Samyang AF 50mm F1.4 FE II primarily, an AF 35mm F1.8 FE

and an AF 135mm F1.8 FE this gives me the coverage I need, and a variety of shot types. 


I love the Samyang AF 50mm F1.4 FE II lens and it's always on my camera because it has the same kind of wide-angle view as you would see with your own eye.

It works great for mediums even to wide if I'm a little bit further back and that f/1.4 just makes it so worthwhile when you have it at dark church. 

My second lens for the second camera is the Samyang AF 35mm F1.8 FE. I generally use that for speeches when I need to stand back a little bit and there isn't really enough room for me. A nifty fifty and a wider angle are always easy to pick up cheaply if you are just starting. 


As you grow you will soon realise that creativity in your storytelling is key. No matter how expensive the gear you have, if you do not tell a story, it doesn’t matter. 

A straightforward way to add an establishing shot is with a drone. Drones are simple to use and relatively inexpensive. 

Just make sure you have the correct licence and insurance in place before flying.


Next on the list, in terms of a more advanced kit, is a gimbal and a monitor. A gimbal is not a necessity, but it’s a great add-on for that super-smooth cinematic look. 

An external monitor could easily belong in the ‘what to buy as a beginner’ category. It helps to compose a shot and has more advanced features for exposure and focusing. The Atomos Ninja V is my go-to monitor as it also records, so no need to worry about carrying multiple memory cards.


Good audio takes the right equipment and a lot of technical skill/instinct during the wedding shooting itself. 

You should arrive early and test the main things to focus on, which would be:


- Eliminate any unwanted noise sources before recording

- Outdoor shots mean wind noise - be careful!

- Check levels for the sound quality of speeches and dialogue


Being over-prepared can prevent a major disaster from occurring. Be cautious and have a backup plan in place, 

and if you are not confident in your skills yet, reach out to others in the industry to help you with the process and to give you pointers.

Last but by no means least are backups - the more the better! It is always a good idea to have multiples of everything - you never know what can go wrong on the day, 

so being prepared is the best option. It is a necessary evil in terms of videography and at such a momentous event you don’t want to be taking any chances with precious memories!


Source: 

https://www.holdan.co.uk/news/love-captured


Newsletter Feedback Shop
Now

三洋で提案する最適の標準画角について調べましょう。

人間との関係、そして美しい空間演出のために小道具を飾る際にも適切な間隙や距離は、必ず要ります。ならば、絵及び写真の作品を正しく鑑賞するために我々は、どれだけの距離をおいて見るのがベスト?

正解は、「作品フレームの対角線の長さ」程度の距離です。

표준화각 자료 이미지
표준화각 자료 이미지

作品の全体を十分視野に入れて鑑賞するためには、作品の対角線の長さほど距離をおいて鑑賞した方がいいです。あまり近い距離で作品を見れば人間の目が集中できる視野角である50度より広がって絵をそのまま鑑賞できなくなってしまいます。 最適の鑑賞、最適の視線のために必要な理想的距離は、写真術にも適用します。 停止画像を撮る写真術では撮像面の対角線の長さと同じく焦点距離のレンズを標準レンズと定義します。

最適の鑑賞、最適の視線のために必要な理想的距離は、写真術にも適用します。 停止画像を撮る写真術では撮像面の対角線の長さと同じく焦点距離のレンズを標準レンズと定義します。デジタルカメラのフルフレームセンサーの大きさは、36x24mmであり、その対角線の長さは、約43.26mmであるため、標準レンズは、何mmにしたらいいのかについての最善の答は、「43.26mmに類似した値」といい、現在まで標準レンズの代名詞と見なされる「50mm」とは、いいきれません。

過去には、フィルムの対角線の長さに似た45mm画角のレンズがありふれましたが、SLR カメラの大成功によってミラーが入る空間を確保するために50mmレンズが標準とされていましたが、最近 ミラーレス一カメラのすそが大きく拡大しながらフランジバックの短いミラーレス一カメラの特性を考慮してより正確に標準レンズの画角を45mm
と再判断すべきではないのかの問題意識からAF 45mm F1.8 FEに対する開発は、始まりました。 サムヤンのAF 45mm F1.8 FEは、35mm画角レンズより最も最小した歪み、55mm画角よりは、一層広いイメージが撮影できて人物、景色、建築物、ペットなど多様なテーマの撮影で結果に満足していただけます。

プリセット絞り機能とは

プリセット絞り機能を使えば、絞りが「絞りクリック解除(De-click)レンズ」のようにスムーズに動作するため、より自然な動画を撮影できます

富士フイルムカメラは、最低の絞り値(Fストップ)に合わせて絞りが制御されるように設計されています。カメラで絞りを制御すると、設定表示が点滅して瞬時に適切な絞り値になりますAF 75mm F1.8 Xは、「プリセット絞り機能」がカメラ本体に意図的に絞り値を伝達しないため、点滅表示なく滑らかに適切な絞り値を調整できます。絞りを制御することで変化した露出に合わせてISO感度とシャッタースピードを調節するので、各ストップ値の中間値でも露出を調整できるからです。

【プリセット絞り機能の使用上の推奨事項とは】

プリセット絞り機能は、動画撮影モードでのみ動作します。
f/1.8の絞りを最大に開き、AモートとMモードで使用することをお勧めします。「プリセット絞り機能」の使用条件は、上記の表をご参照ください。

* プリセット絞り機能の使い方

1) カメラ本体の設定
      AFモード → 動画撮影モード(「A」または「M」モード)→ 絞り値をf/1.8に固定
(2) AF 75mm F1.8 Xレンズの設定
      カスタムスイッチをモード2(M2)にスイッチ
(3) フォーカスリングでプリセット絞りを調整

【プリセット絞り機能の使用上の推奨事項とは】

プリセット絞り機能は、動画撮影モードでのみ動作します。
f/1.8の絞りを最大に開き、AモートとMモードで使用することをお勧めします。「プリセット絞り機能」の使用条件は、上記の表をご参照ください。

* プリセット絞り機能の使い方

1) カメラ本体の設定
      AFモード → 動画撮影モード(「A」または「M」モード)→ 絞り値をf/1.8に固定
(2) AF 75mm F1.8 Xレンズの設定
      カスタムスイッチをモード2(M2)にスイッチ
(3) フォーカスリングでプリセット絞りを調整

[Dolly Shotとは?簡単な撮影方法はこちらで!]

【Dolly Shot とは?】

一般的にカメラをキャスター付きのカート(ドリー)やモータ搭載のカメラクレーンなどで移動させ、被写体との距離を調節しながら撮影する方法です。この方法で感覚的な効果とドラマチックな効果を最大化し、被写体と視聴者の心理的な距離感を調整できます。

【簡単にハンドヘルドでDolly Shotを撮る方法】

Tip. 移動距離が長いとカメラが揺れることがありますので、焦点距離35~100mmの間で撮影してください。
1. 被写体と約1.5~2m 程度の距離に立ちます。
2. カスタムスイッチをMFとMode3に設定した後、画角は約100mmに設定します。
3. フォーカスリングを調節して被写体に焦点を合わした後、 絞りはF8~16に設定します。
4. 上体と腕を動かしてカメラを被写体側に近づけながらズームリングを左(広角側)にゆっくり回します。
5. Dolly Shot完成です!
※ 被写体とより遠い距離で撮影するときにはドリーやジンバルなどを活用するとより安定した撮影ができます。

DSLR / Full Frame
1D X Mark Ⅱ
1D X
1Ds Mark Ⅲ
1Ds
5DsR
5Ds
5D Mark Ⅳ
5D Mark Ⅲ
6D Mark Ⅱ
6D
DSLR / APS-H
1D Mark Ⅲ
1D
Mirrorless / APS-C
M6
M5
M10
M3
M2
DSLR / APS-S
7D Mark Ⅱ
7D
80D
70D
60D
30D
D60
D30
77D (9000D)
760D (8000D / Rebel T6s)
1300D (Kiss X80 / Rebel T6)
1200D (Kiss X70 / Rebel T5)
200D (Kiss X9 / Rebel SL2)
800D (Kiss X9i / Rebel T7i)
700D (Kiss X9i / Rebel T7i)
100D (Kiss X7 / Rebel SL1)
650D (Kiss X6i / Rebel T4i)
600D (Kiss X5 / Rebel T3i)
550D (Kiss X4 / Rebel T2i)
500D (Kiss X3 / Rebel T1i)
1000D (Kiss F / Rebel XS)
450D (Kiss X2 / Rebel X냐)
DSLR / Full Frame
D850
D5
D810A
D4S
D810
D750
Df
D610
D4
D800
D800E
D600
D3s
D3x
D700
D3
DSLR / APS-C
D7500
D3400
D500
D5600
D7200
D5500
D3300
D7100
D5300
D5200
D7000
D300s
D300
DSLR / Full Frame
Z6
Z7
D810A
D4S
D750
D810A
DSLR / APS-C
D7200
D500
D3300
D5500
D5600
D3400
D7500

* Cameras released within 5 years from 2019 are tested.

パスワード変更のご案内

ホン・ギルドン様はパスワードを変更されてから 3ヶ月が経過しました。

パスワードをお忘れですか?
以下の情報をご入力ください。

認証コードを受信する

ご入力いただいた電話番号 に認証コードを送信いたします。
標準料金がかかります。

Failed

There is no ID found with that information.
Please confirm the accuracy of your information.

If you would like to create a new account, please click the below link.

Join now

IDをお忘れですか?
以下の情報をご入力ください。

以下の情報をお確かめください。

1つのIDが見つかりました。

それでもIDが見つからない場合、本人認証を通してIDをお探しください。

本人認証

失敗

申し訳ありません。一致する情報がありません。
情報が正しいかお確かめの上、もう一度お試しください。

新規アカウントを作成するなら、次のリンクをクリックしてください。

アカウント作成

Eメール送信完了

会員登録の最終段階です。 以下のEメールアドレスで
受信したリンク先に移動してください。


アカウント認証

이메일 발송 완료

고객님 메일로 임시비밀번호가 발송되었습니다.


확인

ID変更

新しいEメールアドレスをご入力ください。
Eメールアドレスを変更した後、再度ログインが必要です。

現在のEメールアドレス :
新しいEメールアドレス :
Change email address

Eメールアドレス変更
メインへ

エラーメッセージ

申し訳ありません。
誤ったアクセスによって要請が拒否されました。
ご質問があれば管理者までお問い合わせください。

メインへ

Eメール認証をする

お客様、こんにちは。
お客様はhongildong@naver.comを
森養オプティクスのIDとして登録されました。
認証ボタンをクリックすると、森養オプティクスの認証が完了します。

アカウント認証

森養オプティクスのアカウントに登録した覚えがありませんか?
他のユーザーがEメールアドレスを誤って入力した可能性もあります。
森養オプティクスのアカウントに登録した覚えがないなら、
下のメール誤用通報のリンクをクリックしてください。

- Eメール保護を希望します。 -

参考 : 本メールは送信専用ですので返信はできません。
ご不明な点がございましたら、次のウェブサイトまでお問い合わせください。 ウェブサイトはこちらから >

Eメール保護

次のアカウントがお客様のEメールを使って登録されています。
このアカウントの使用を中止されるなら、
下の「アカウントを遮断する」ボタンをクリックしてください。

hongildong@naver.com

アカウントを遮断する

Account authentication

Congratulations!
Your account has been verified.
Meet the various services of Samyang Optics!

Sign in
Go main

IDを探す

一致する会員情報がありません。

找回ID

ID確認

お探しのIDは bebe***と確認されました。

确认

ID確認

ご入力いただいた情報と一致する情報がありません。
もう一度お確かめください。

确认

パスワードを探す

パスワードを再設定するためのEメールが
ユーザーのアカウントに転送されました。

hongildong@naver.com

受信したEメールをお確かめの上、
案内に従ってパスワードを再設定してください。
万一メールを受信できない場合には、
迷惑メールフォルダをお確かめください。

确认

Eメールが見つかりませんか?

認証メール再送信

パスワードを探す

ご入力いただいた情報と一致する情報がありません。
もう一度お確かめください。

确认
USB Driver DOWNLOAD
ⓒDaniel Gangur

Sign Up for
Samyang Newsletter

Be the first to know about new product
announcement, global events and news!

By subscribing, you agree to the terms and conditions of use of the site and the use of personal information. Newsletter will be sent until unsubscribed.
Don't show this popup today

Samyang Optics,
with 50 years of history,
begins a new journey as
LK SAMYANG

Don't show this popup today
WE HAVE MOVED!

NEWSLETTER

Subscribe to our newsletter to receive new product alerts
and inspiring contents created with Samyang lens

Do not open this window for today
/upload/magazine/pro/1707269671(0).png